Before you can send and receive email messages using Microsoft Outlook 2010, you must add and configure an email account. If you have used an earlier version of Microsoft Outlook on the same computer where you have installed Outlook 2010, your account settings are automatically imported.
About email accounts
Outlook supports Microsoft Exchange, POP3, and IMAP accounts. Your Internet service provider (ISP) or email administrator can give you the configuration information that you must have to set up your email account in Outlook.
Email accounts are contained in a profile. A profile is made up of accounts, data files, and settings that specify where your email messages are saved. A new profile is created automatically when you run Outlook for the first time.
Add an email account when you first start Outlook 2010
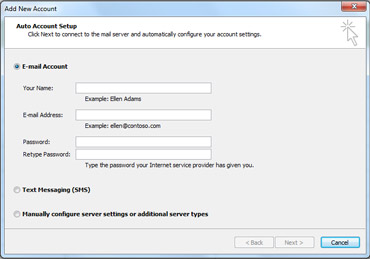
If you are new to Outlook or are installing Outlook 2010 on a new computer, the Auto Account Setup feature automatically starts and helps you configure account settings for your email accounts. This setup requires only your name, email address, and password. If your email account can’t be automatically configured, you must enter the required additional information manually.
- Start Outlook.
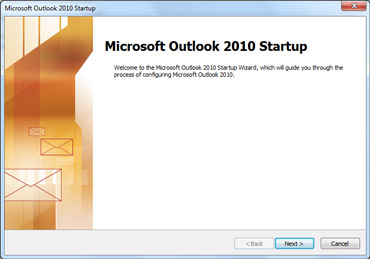
- When prompted to configure an email account, click Next.

- To add an email account, click Yes, and then click Next.
- Enter your name, email address, and password, and then click Next.
 If you enter an email address that ends with outlook.com or msn.com, you must use the Microsoft Outlook Hotmail Connector to add the email account.NOTE: When your computer is connected to a network domain for an organization that uses Microsoft Exchange Server, your mail information is automatically inserted. The password box doesn't appear because your network password is used.A progress indicator appears as your account is configured. The setup process can take several minutes.
 If the initial attempt to configure your account fails, a second attempt can be made using an unencrypted connection to the mail server. If you see this message, click Next to continue. If the unencrypted connection also fails, your email account can’t be automatically configured.
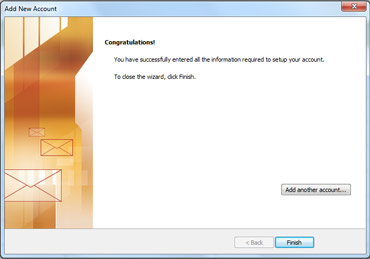
 Click Retry, or select the Manually configure server settings check box.After the account is successfully added, you can add more accounts by clicking Add another account.
- To exit the Add New Account dialog box, click Finish.
Add an email account in Outlook
Although most people add an email account when Outlook first runs, your first or additional email accounts can be added at any time.
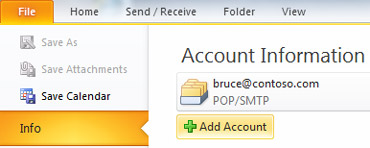
- Click the File tab.
- Under Account Information, click Add Account.

- Enter your name, email address, and password, and then click Next.
 If you enter an email address that ends with outlook.com, or msn.com, you must use the Microsoft Outlook Hotmail Connector to add the email account.NOTE: When your computer is connected to a network domain for an organization that uses Microsoft Exchange Server, your mail information is automatically inserted. The password box doesn't appear because your network password is used.A progress indicator appears as your account is configured. The setup process can take several minutes.
 If the initial attempt to configure your account fails, a second attempt can be made using an unencrypted connection to the mail server. If you see this message, click Next to continue. If the unencrypted connection also fails, your email account can’t be automatically configured.
 Click Retry, or select the Manually configure server settings check box.After the account is successfully added, you can add more accounts by clicking Add another account.
- To exit the Add New Account dialog box, click Finish.If you added an Exchange Server account, you must exit and restart Outlook before the account appears and can be used in Outlook.
NOTE: If your profile already contains a Microsoft Exchange Server account, and you want to add another, you must use the Auto Account Setup. To manually configure an additional Exchange Server account, you must exit Outlook, and then use the Mail module in Control Panel.
Remove an email account
- Click the File tab.
- Under Account Information, click Account Settings, and then click Account Settings.

- Select the email account that you want to remove, and then click Remove.
- To confirm removal of the account, click Yes.
To remove an email account from a different profile, exit and restart Outlook with the other profile and follow the previous steps. You can also remove accounts from other profiles by doing the following:
- Exit Outlook.
- In Control Panel, click or double-click Mail.
Where is Mail in Control Panel?
Mail appears in different Control Panel locations depending on the version of the Microsoft Windows operating system, Control Panel view selected, and whether a 32- or 64-bit operating system or version of Outlook 2010 is installed.
The easiest way to locate Mail is to open Control Panel in Windows, and then in the Search box at the top of window, typeMail. In Control Panel for Windows XP, type Mail in the Address box.
NOTE: The Mail icon appears after Outlook starts for the first time.
The title bar of the Mail Setup dialog box contains the name of the current profile. To select a different existing profile, clickShow Profiles, select the profile name, and then click Properties.
- Click E-mail Accounts.
- Select the account, and then click Remove.
- To confirm removal of the account, click Yes.NOTES:
- Removing a POP3 or IMAP email account doesn’t delete the items that were sent and received by using the account. If you were using a POP3 account, you can still use the Outlook Data File (.pst) to work with your items.
- If you are using an Exchange account, your data remains on the mail server unless you move it to an Outlook Data File (.pst).